Shopify Integration
Connect your Shopify store to Tailor AI and tie completed checkouts, and their revenue, back to the experiment each shopper saw. One click to install, no theme code, and nothing to configure inside Shopify.
Quick start
Install in 3 easy steps
- 1Install the appOpen your install link in Shopify Admin and approve. It connects your store automatically.Details
- 2Create a goal in TailorPick the Shopify event to track. Checkout completed carries revenue.Details
- 3Verify end to endSelect the goal in your experiment, place a test order, and see it land in Tailor.Details
Step 1: Install the Tailor App on Shopify
Ask the Tailor team for a Shopify install link. Each link is unique to one storefront, so request one for the exact store you want to track. Your storefront's address looks like shop1.myshopify.com or admin.shopify.com/store/shop1, share whichever form you see so the Tailor team links the right store.
Open the link while signed in to that store's Shopify Admin and approve the app. That's the whole install: when you open the Tailor AI app it connects your store to your Tailor account automatically and starts loading Tailor AI on every storefront page. No theme editing, no IDs to copy.
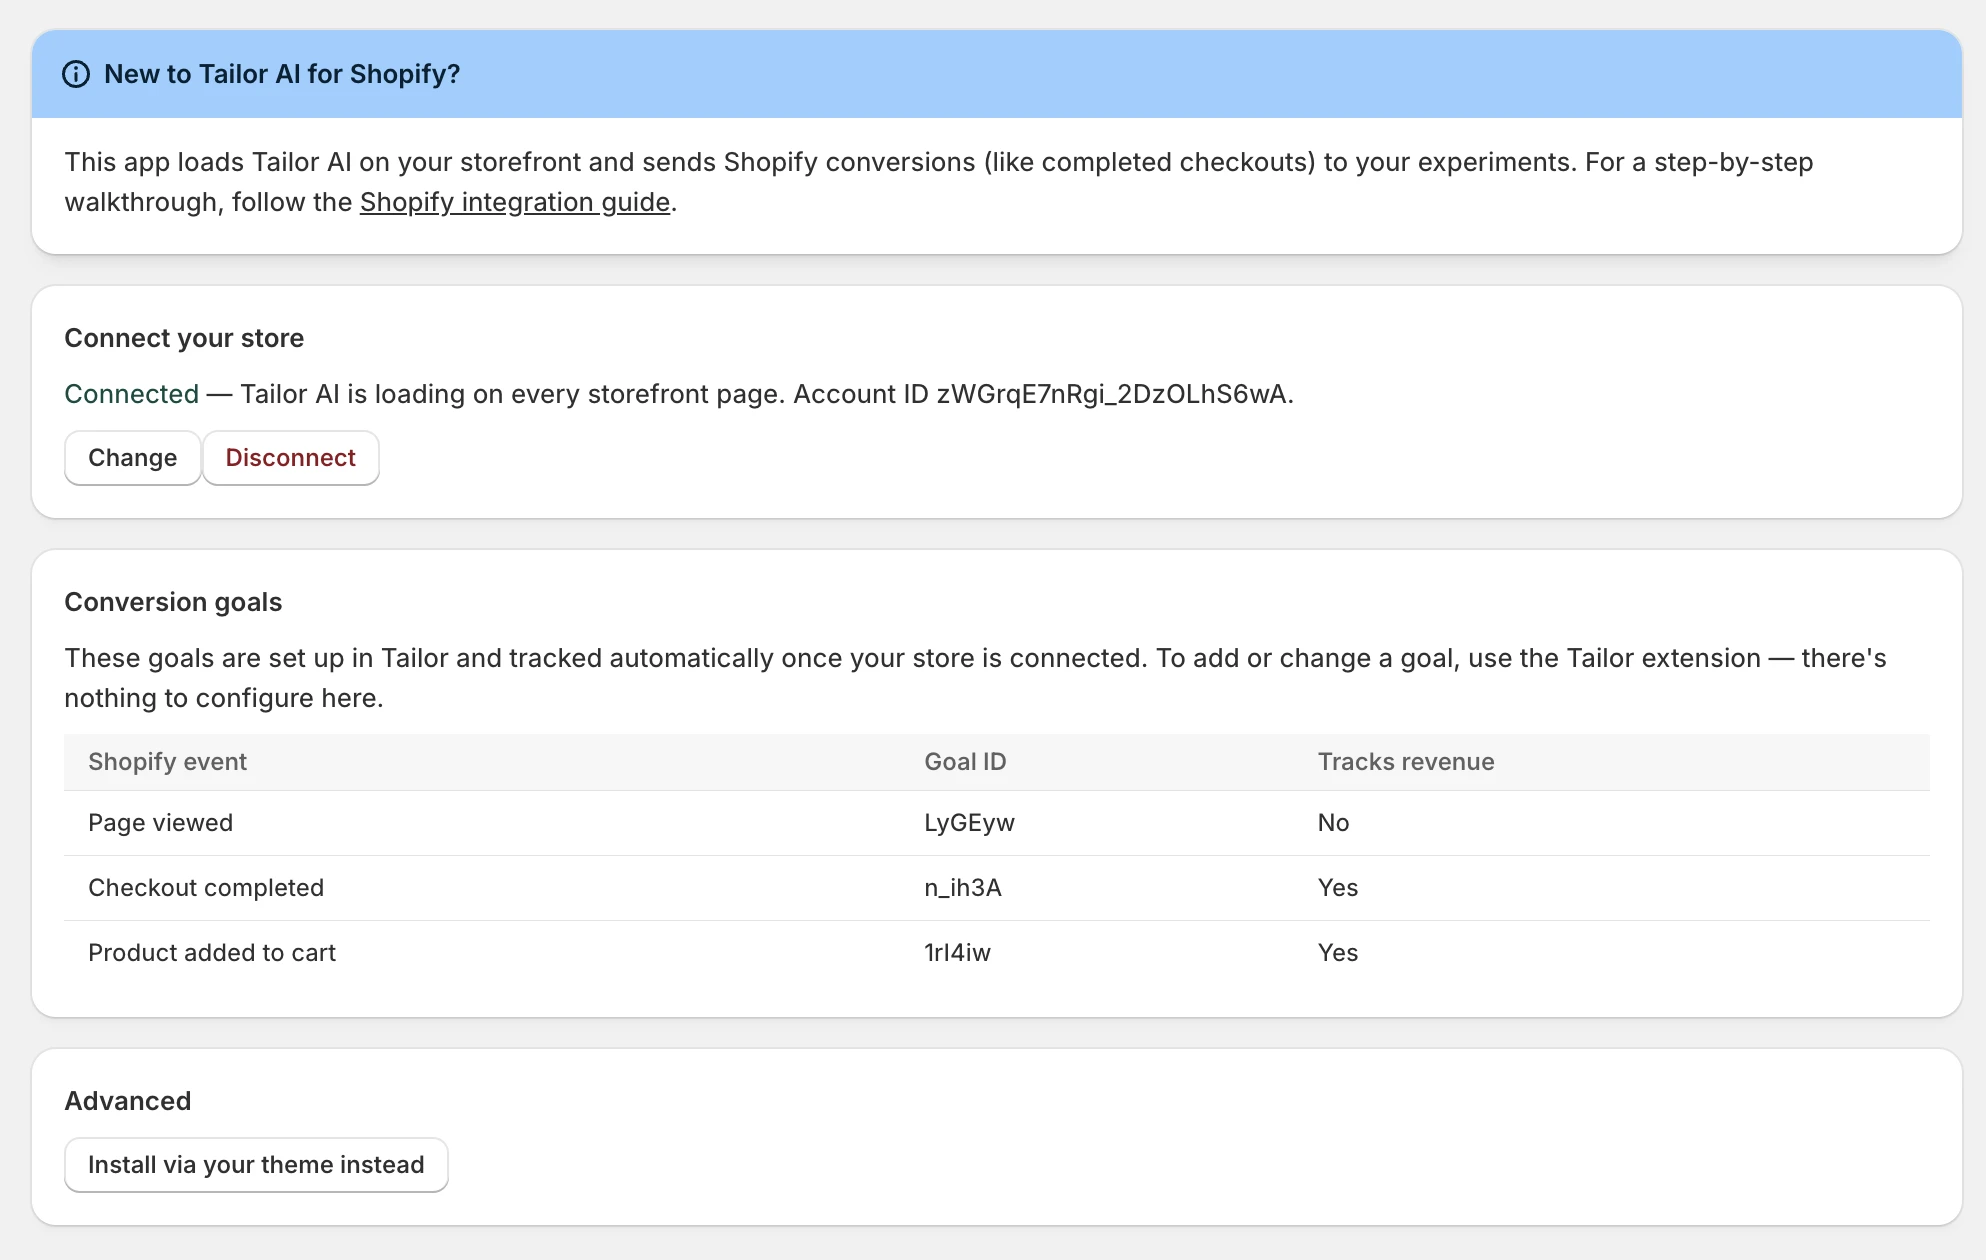
If the app shows a Connect your store field asking for an Account ID instead of "Connected", see If the app asks you to connect below.
Step 2: Create a Shopify Goal in Tailor
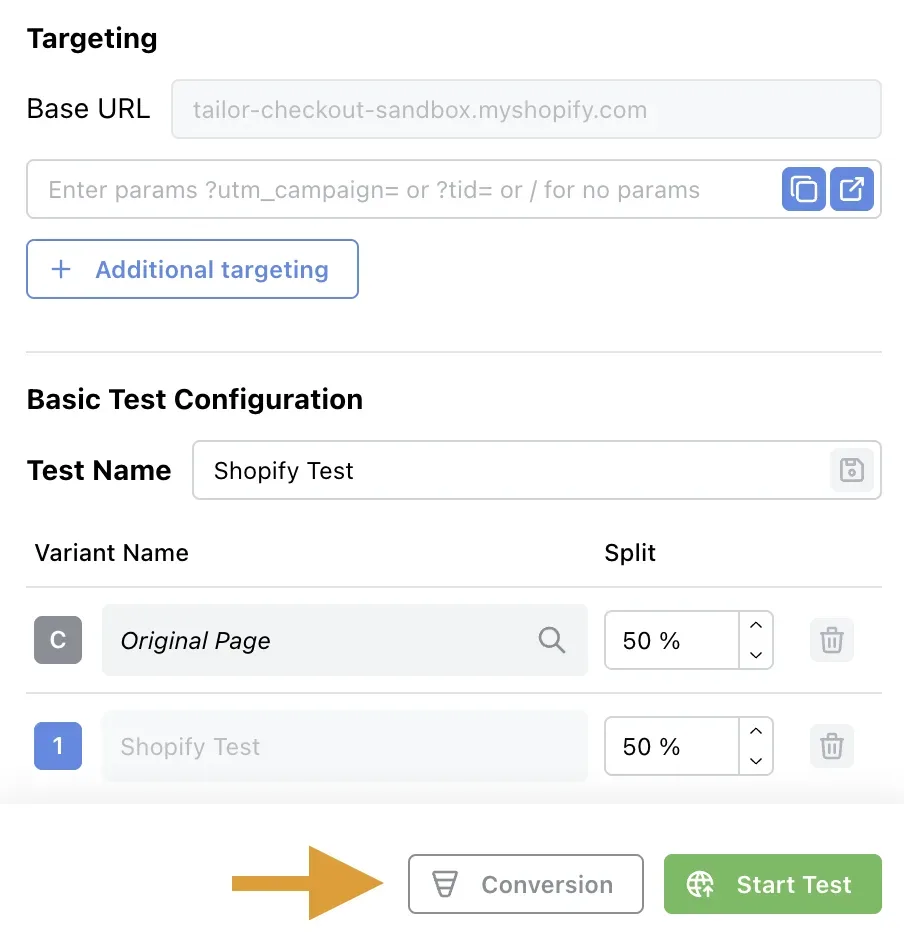
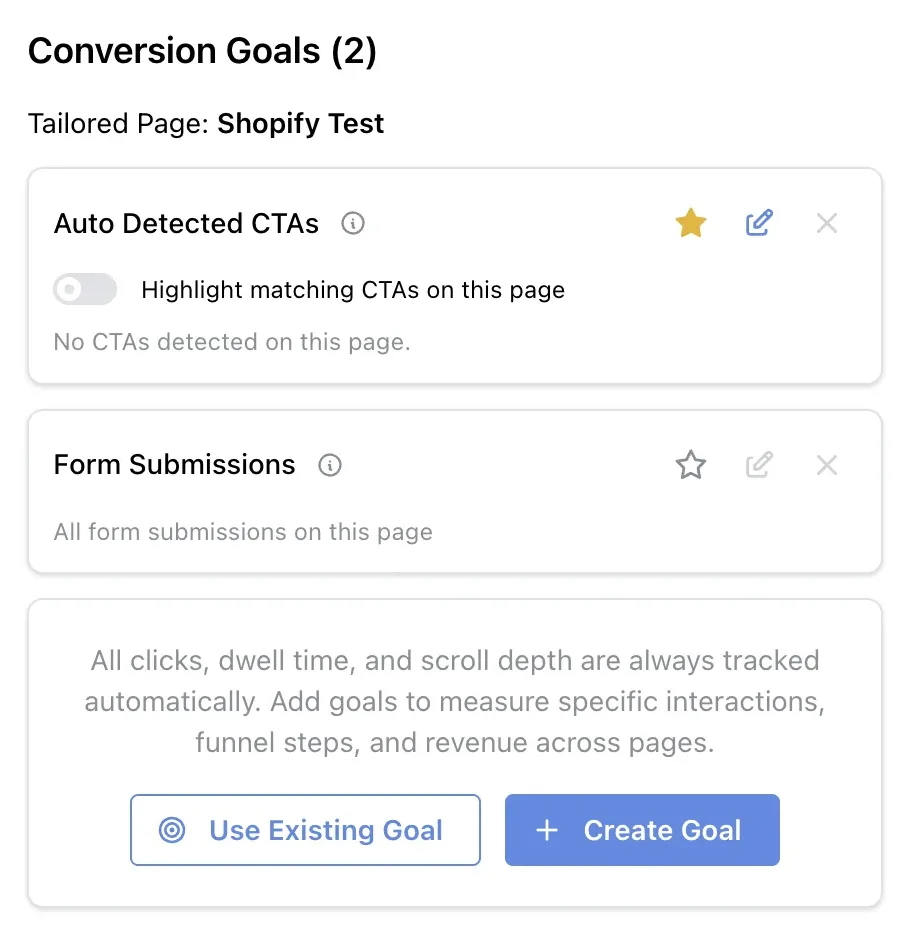
Goals live in Tailor, not in the Shopify app. In the Tailor AI Chrome extension, open the test you want to track, go to its Ramp & Test tab, and click Conversion to open the goals panel. Then click Create Goal.
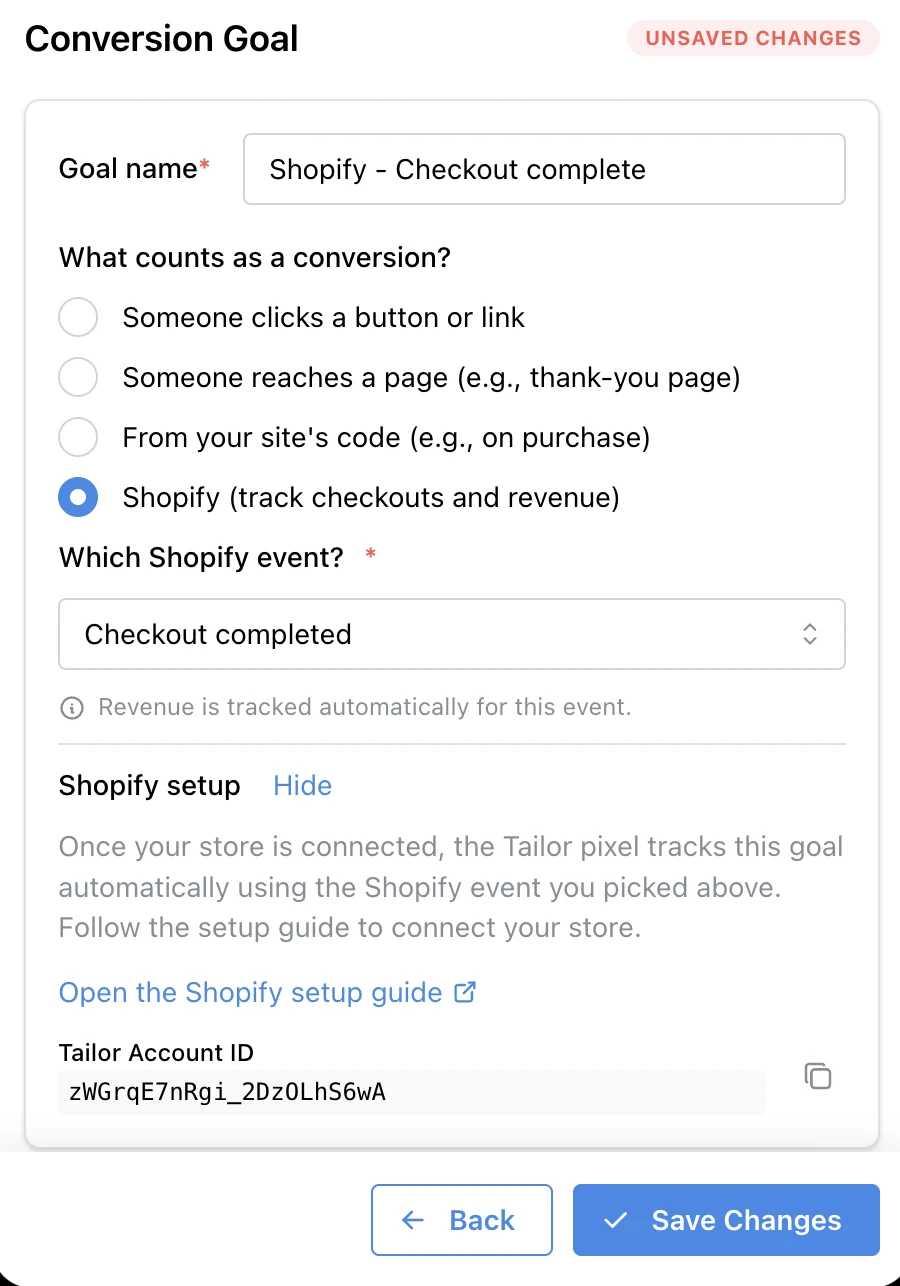
In the goal panel that opens, set it up like this:
- Name the goal.
- Under What counts as a conversion?, choose Shopify (track checkouts and revenue).
- Under Which Shopify event?, pick the event to track, for example Checkout completed. If the event carries an order total, revenue is tracked automatically, there's nothing to toggle.
- Save. That's it, there is nothing to copy into Shopify.
It syncs on its own
Once your store is connected, the app picks up your Shopify goals automatically. Within about a minute the goal appears in the Shopify app's Conversion goals table and starts tracking on your storefront.
Revenue is automatic
Events that carry an order total (like Checkout completed) send revenue in the order's own currency. Events without one (like a page view) just count conversions. There is no revenue checkbox to manage.
Step 3: Verify End to End
Conversions are measured against an experiment, so the real test is the full loop: a tailored page experiment measuring your Shopify goal, then a test order that shows up on its results.
- 1Pick the goal in your experiment. In the experiment's Ramp & Test tab, open Conversion and select your Shopify goal as the success metric. If you created the goal there in Step 2, it's already selected.
- 2Place a test order. Visit your store through a page the experiment runs on, then complete a Shopify test order. It fires Checkout completed just like a real one.
- 3Confirm in Tailor. The conversion and its revenue appear on the experiment's results, attributed to the variant you saw (counts can take a few minutes).
Quick sanity check anytime: open the Tailor AI app in Shopify Admin and confirm your goal is listed under Conversion goals. New goals appear within about a minute of saving.
If the App Asks You to Connect
Most installs connect automatically. If the app instead shows a Connect your store field, paste your Tailor Account ID, the 22-character ID shown under Shopify setup in any Shopify goal's panel (click to copy), and click Connect. This is a one-time step; use Change or Disconnect in the same section to update it later.
Prefer to manage the script in your theme? The app's Advanced section has a theme app embed and a <head> snippet. Pick just one install path.
How It Works
Tailor's Shopify app connects your store to Tailor AI. It loads the Tailor AI tracking script on your storefront and reports Shopify events, like a completed checkout, against your Tailor conversion goals. This links an order and its revenue back to the variant the shopper saw, so you can measure lift on revenue, not just clicks.
All goal setup happens in Tailor. You pick which Shopify event a goal tracks when you create the goal, and the app on your store picks it up automatically. There is no per-event configuration inside Shopify.
Supported Events
A Shopify goal can track any of Shopify's standard customer events. The Revenue column shows which ones carry an order total: for those, the goal records revenue automatically, in the order's own currency. Events without revenue (like page views) just count conversions.
| Shopify event | Revenue |
|---|---|
| Page viewed | No |
| Collection viewed | No |
| Search submitted | No |
| Product viewed | Yes |
| Cart viewed | Yes |
| Product added to cart | Yes |
| Product removed from cart | Yes |
| Checkout started | Yes |
| Checkout contact info submitted | Yes |
| Checkout address info submitted | Yes |
| Checkout shipping info submitted | Yes |
| Payment info submitted | Yes |
| Checkout completed | Yes |
For revenue results, pick Checkout completed as your goal's event. It carries the order total and it's the event Shopify reports when an order is placed. See Shopify's checkout_completed reference.